



中转站推荐
用我邀请码有些送额度。
安装 nvm + Node + codex cli + PowerShell 7 + Python (Miniforge)
-
安装 nvm 管理 Node 版本
- Windows:Releases · coreybutler/nvm-windows
- Linux/Mac:
# curl or wget
curl -o- https://raw.githubusercontent.com/nvm-sh/nvm/v0.40.4/install.sh | bash
wget -qO- https://raw.githubusercontent.com/nvm-sh/nvm/v0.40.4/install.sh | bash
-
nvm 安装 Node(JavaScript 执行环境)
新开终端命令行。# 安装 Node 24 nvm install 24 # 使用 Node 24 nvm use 24 -
安装 codex cli
# 安装 codex cli npm i -g @openai/codex -
Windows 推荐安装 PowerShell 7,让 Agent 优先使用性能更好的 pwsh 命令。
-
安装 Python,推荐 Miniforge,下载对应版本安装即可:conda-forge | community-driven packaging for conda
安装配置 CC Switch
下载地址:Releases · farion1231/cc-switch
- 不推荐直接修改 codex cli 配置文件(
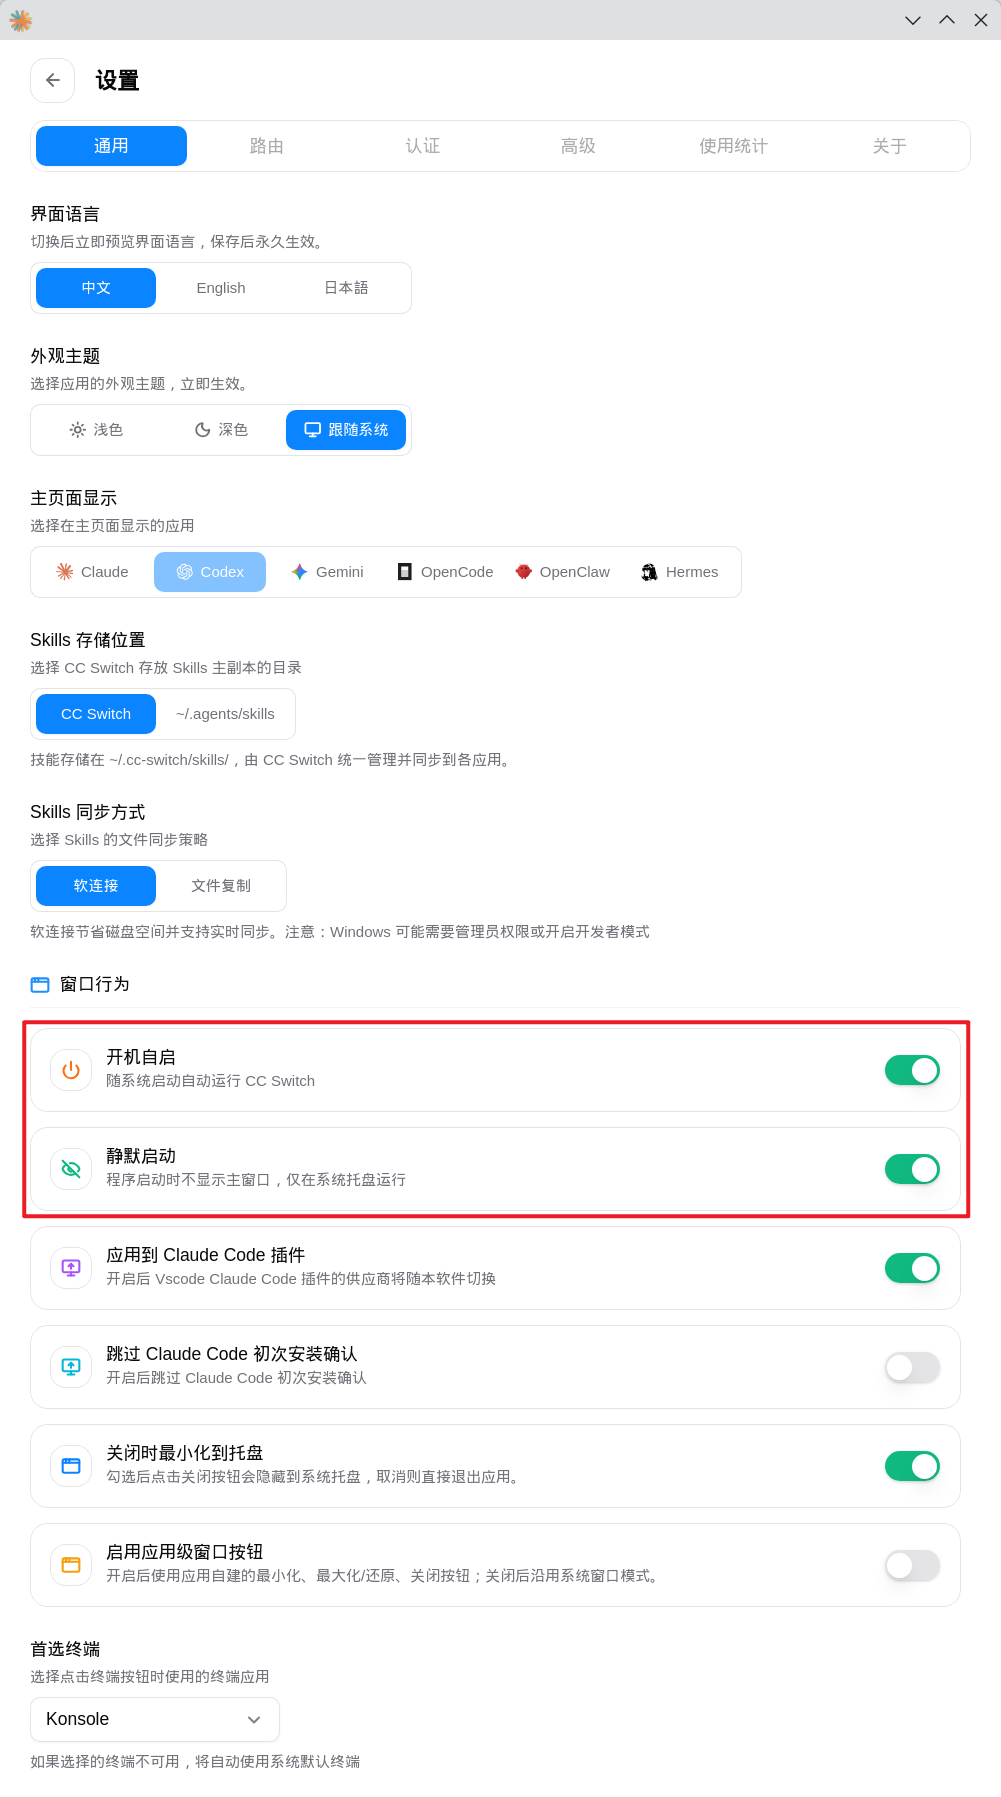
~/.codex/config.yaml和~/.codex/auth.json)来修改为第三方 API。 - 不推荐使用 CC Switch 时不开启本地路由和自动故障转移,不然切换供应商后还需要重启 Codex 或相关软件。
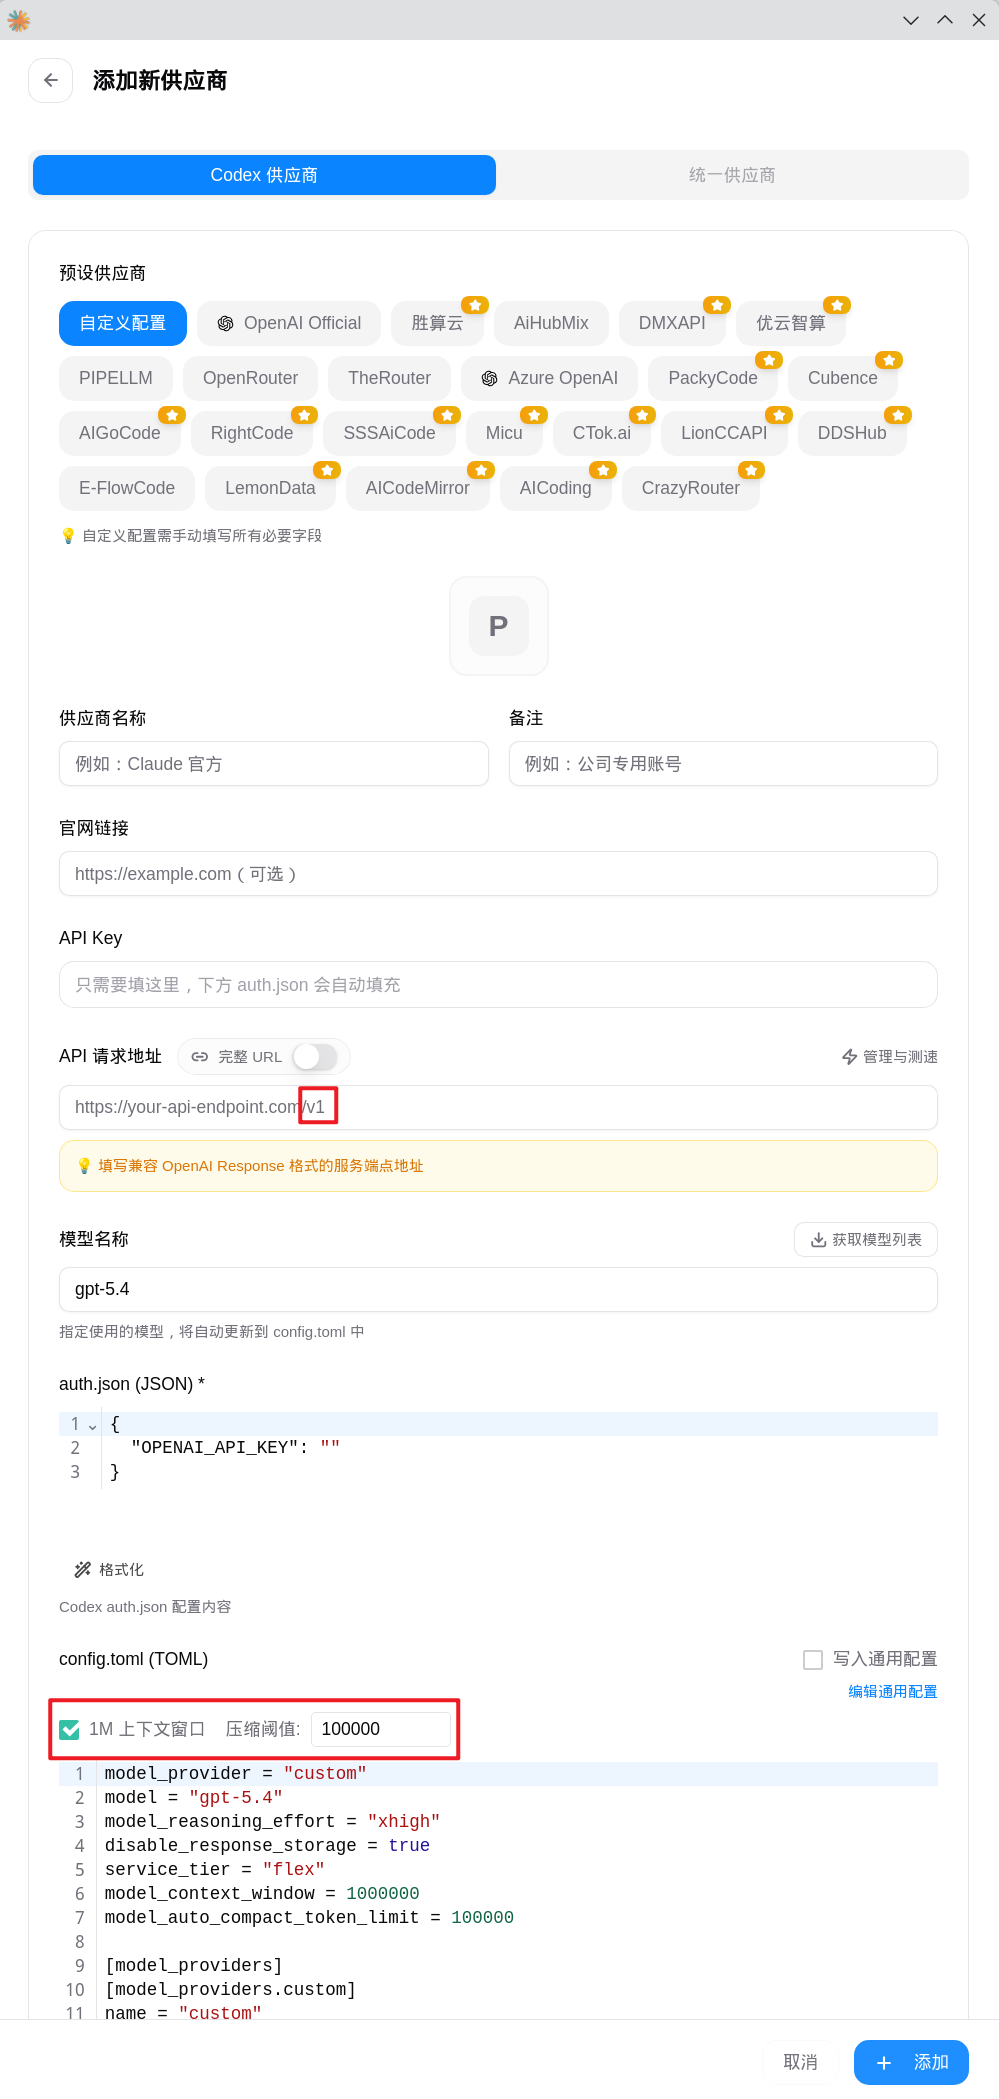
- 添加新供应商
- API Key 为中转站中创建的令牌/密钥,API 请求地址为中转站提供的线路,一定要
/v1结尾。可以在后面”管理与测速“中添加多个地址。 - 推荐配置通用配置:
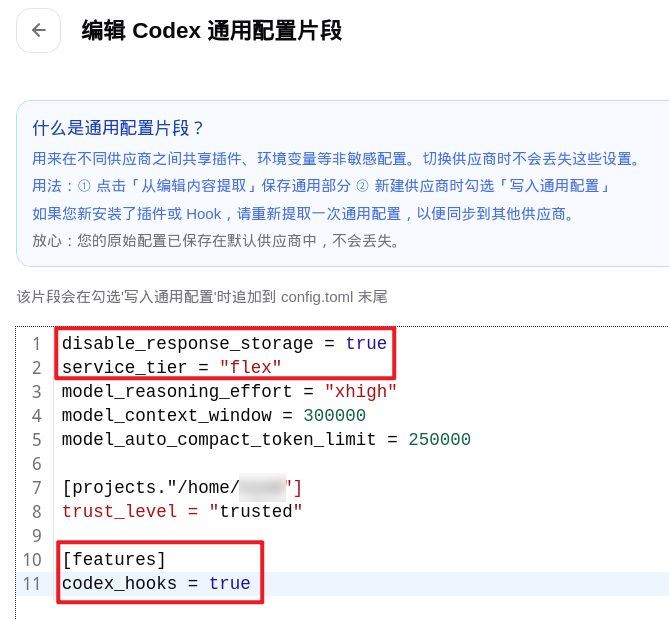
disable_response_storage = true:希望禁用响应存储功能,保持匿名。service_tier = "flex":希望走 Flex 层,价格更低,响应更慢。[features]换行hooks = true:开启 Hook 功能,给其他 AI 工具使用 hook 注入。codex_hooks已弃用,请换成hooks,参考 Config basics – Codex | OpenAI Developersmodel_context_window = 300000:最大上下文,按需设置。model_auto_compact_token_limit = 250000:压缩阈值,按需设置。
- 可以勾选
1M 上下文窗口,即每次会话最大上下文为 1M,如果达到压缩阈值会压缩上下文。轻量使用可以设置为 300000 和 250000。
- API Key 为中转站中创建的令牌/密钥,API 请求地址为中转站提供的线路,一定要
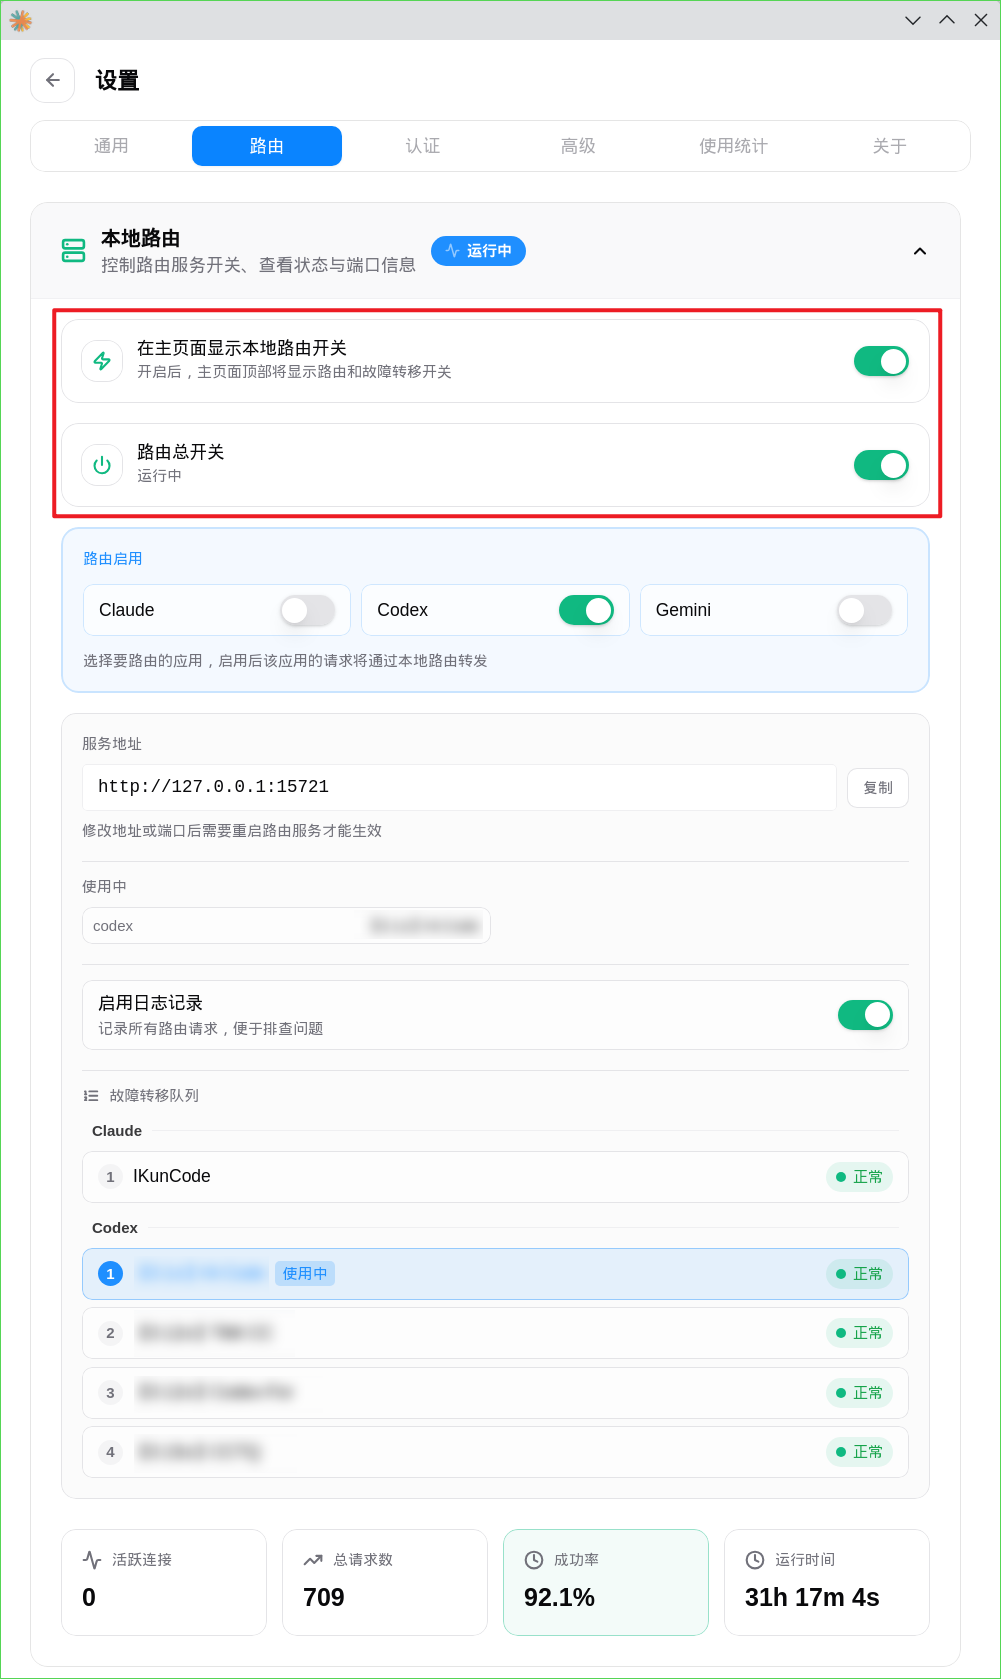
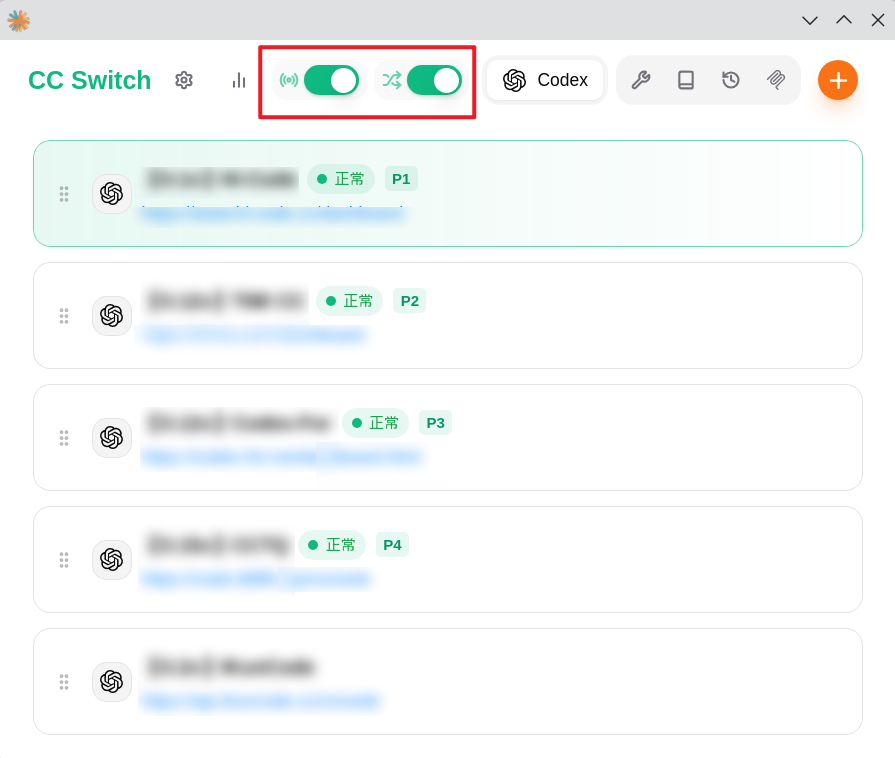
- 本地路由:CC Switch 提供服务,Codex 使用时将请求发送到 CC Switch,CC Switch 再将请求转发给供应商,这样就不用重启 Codex。
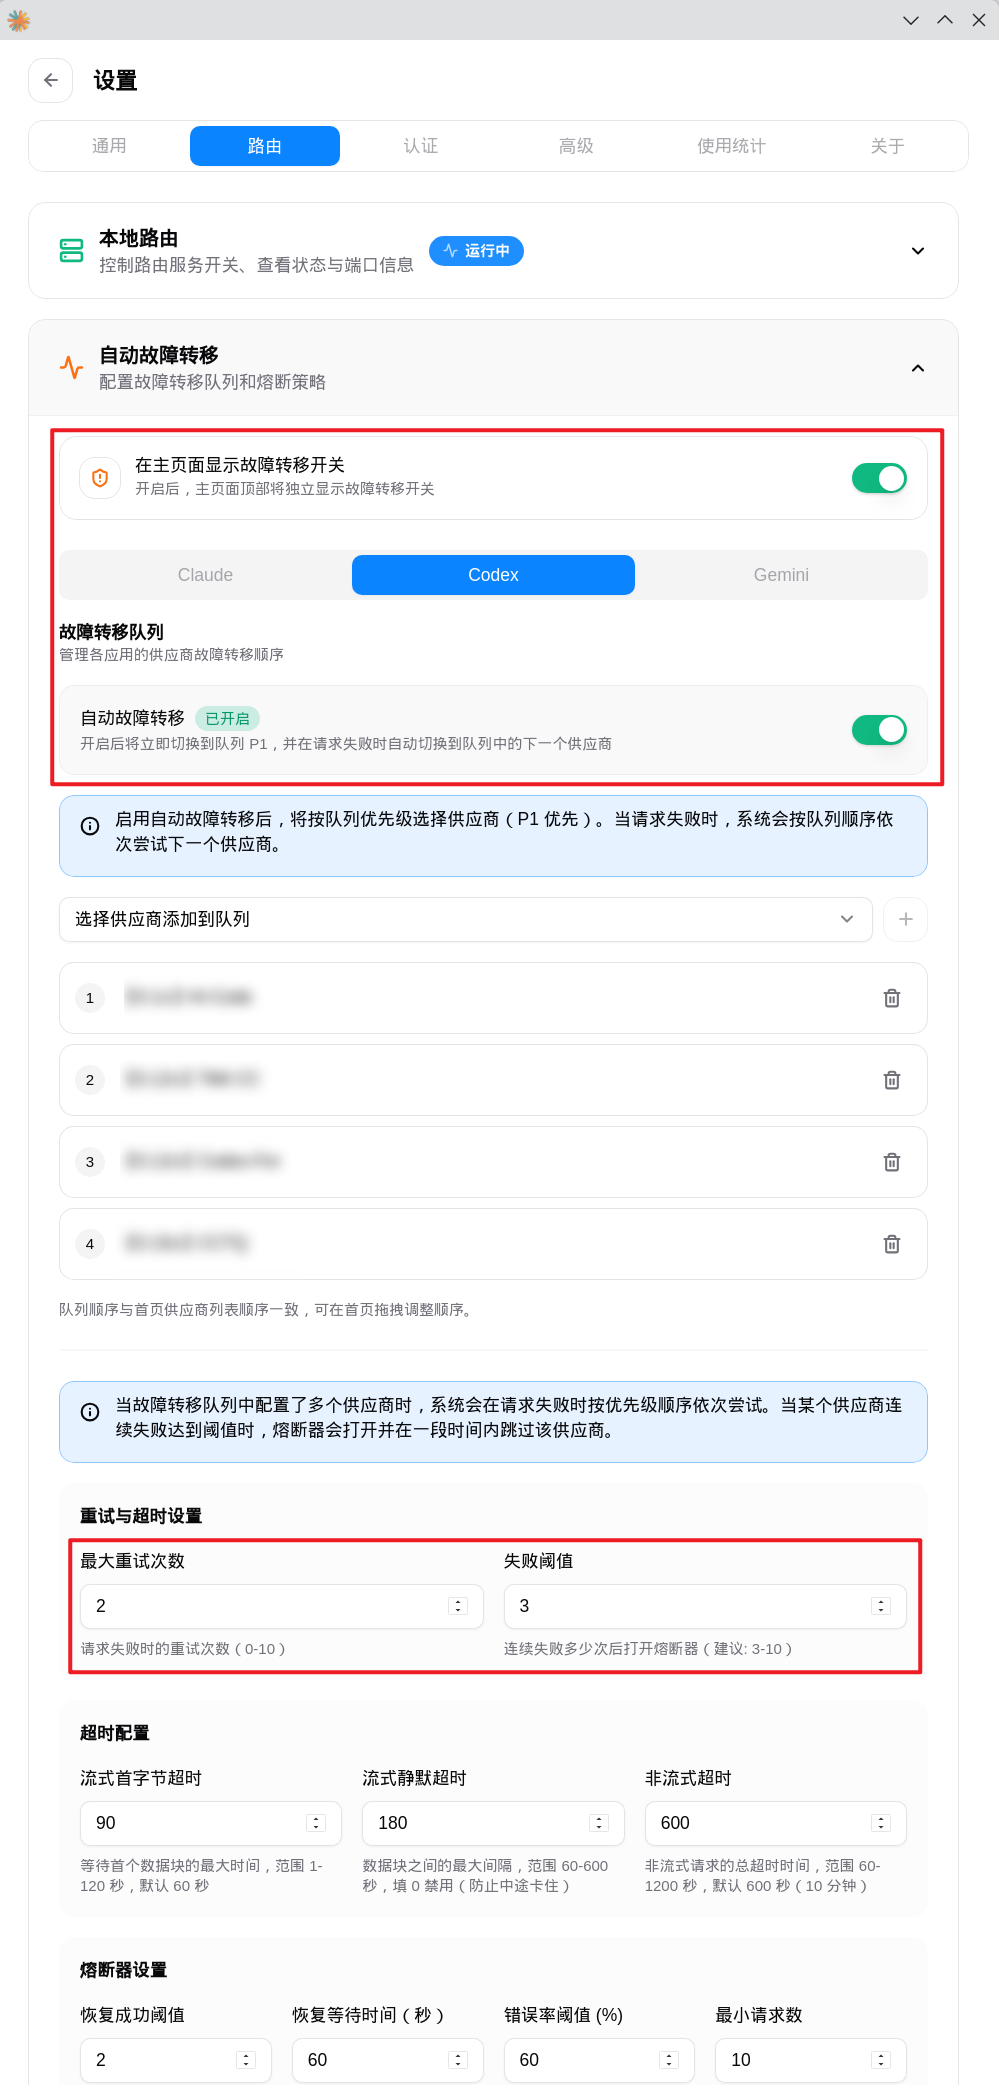
- 自动故障转移:某个供应商失效时自动切换到下一个供应商
- 主页开启本地路由和自动故障切换。
Codex APP
Codex 有多种使用方式,推荐 Codex APP。
-
安装
- Windows/Mac:Codex App | 桌面端多线程与工作树协作
- Linux:
# 非 Arch 系 Linux
git clone https://github.com/ilysenko/codex-desktop-linux.git
cd codex-desktop-linux
make bootstrap-native

# AUR
paru -S openai-codex-desktop
-
安装后在
File-Settings修改语言为中文,然后File-Exit后重新打开。 -
软件设置:
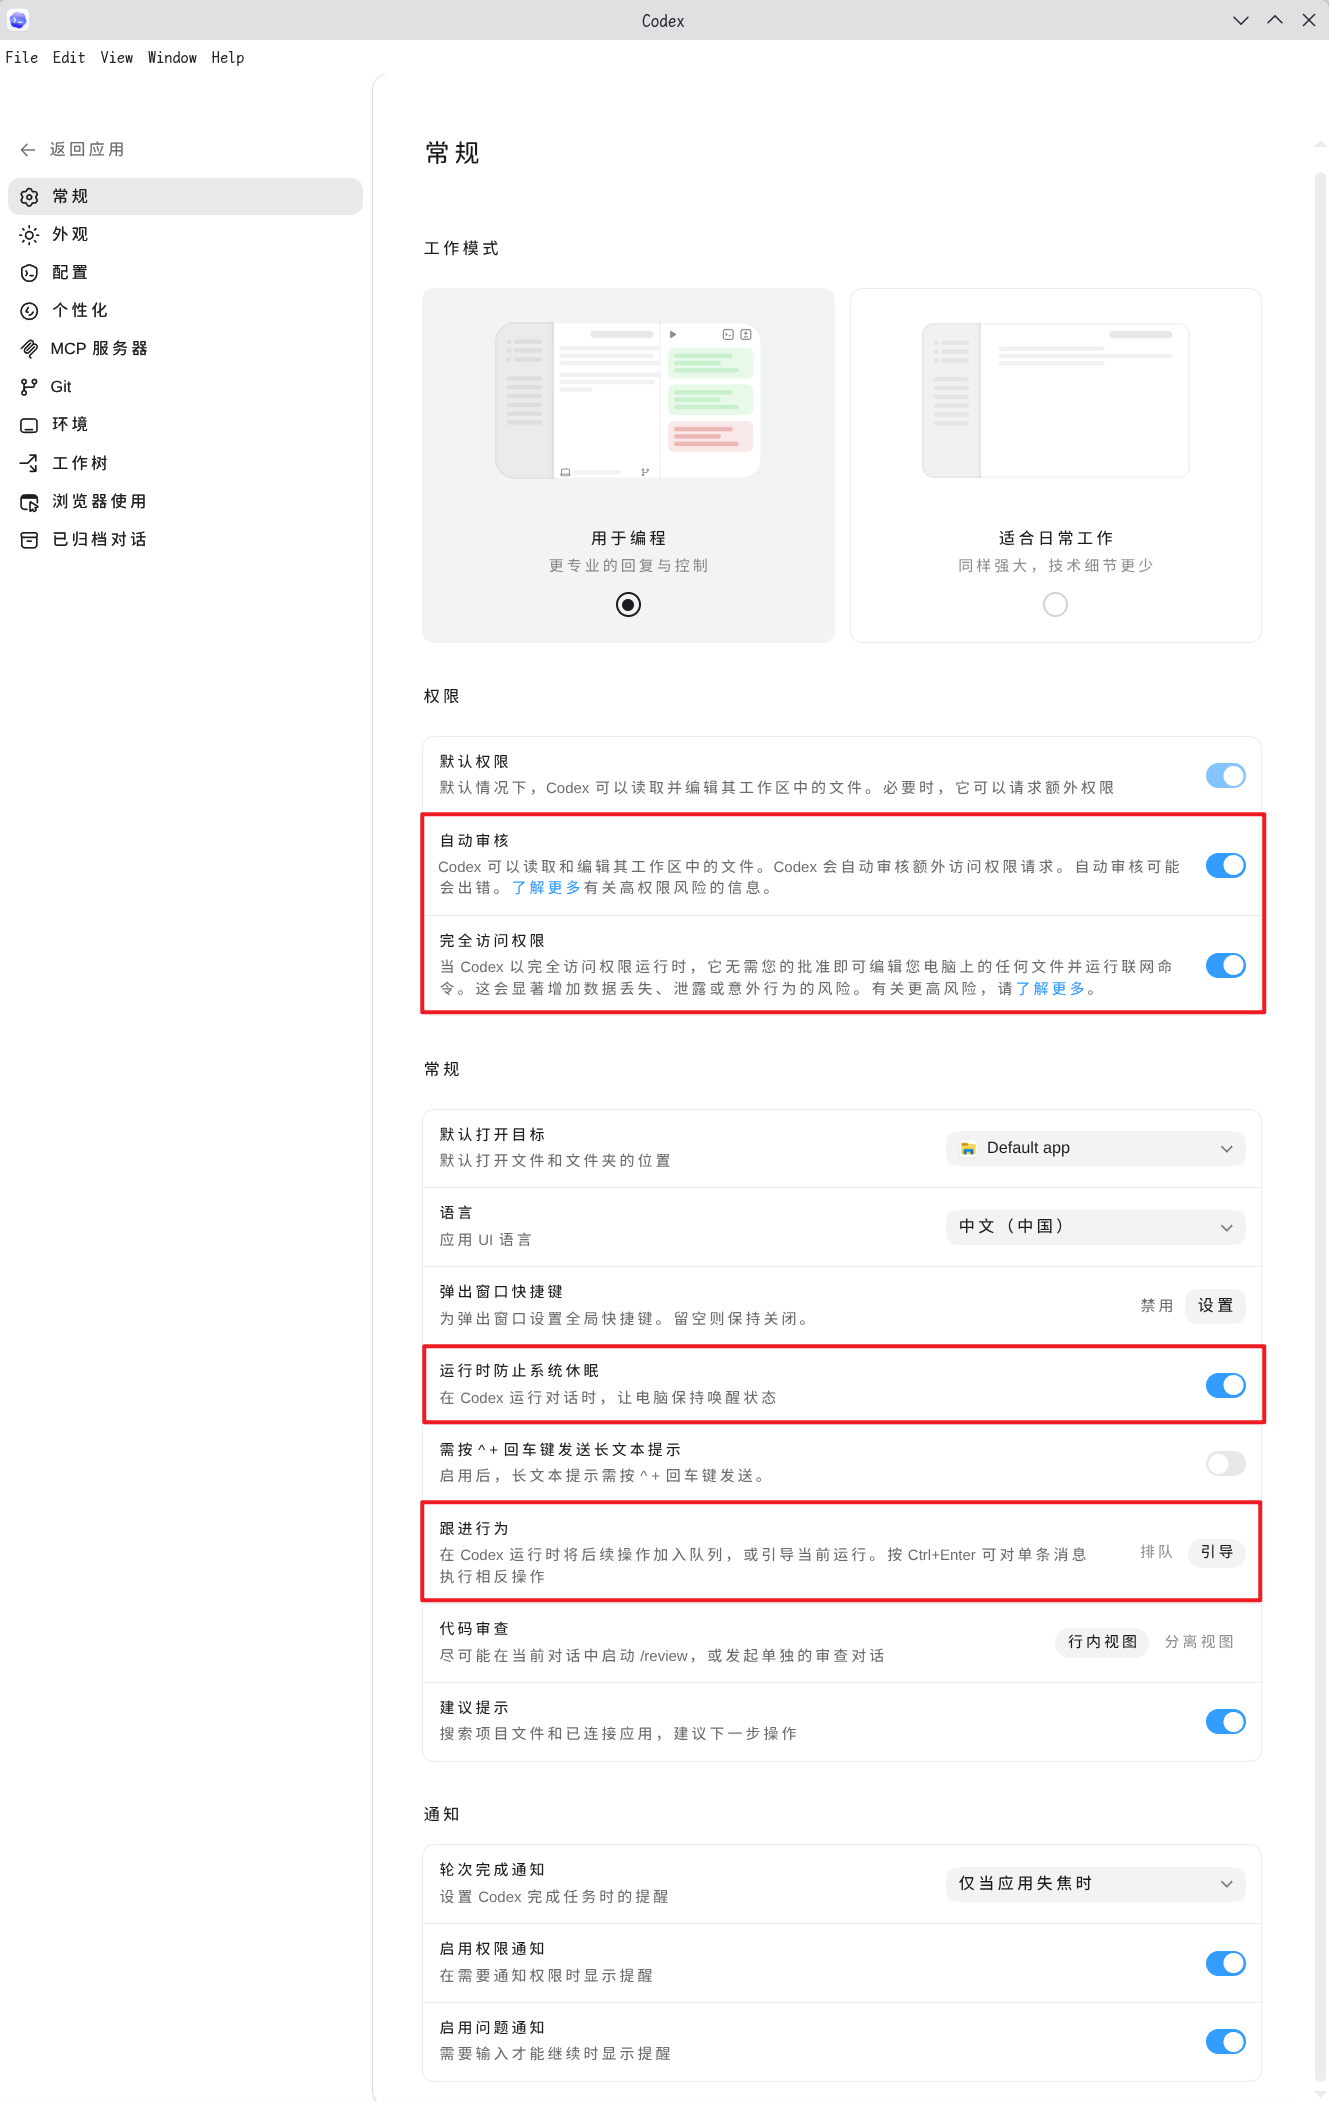
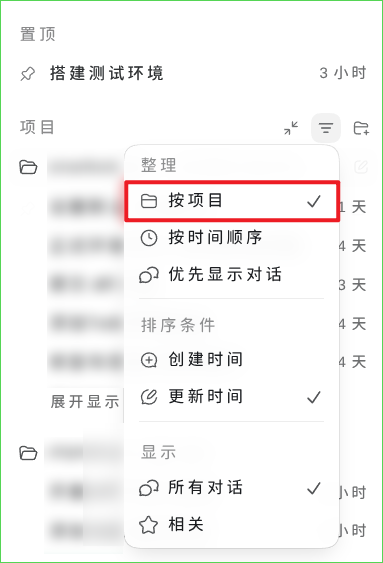
-
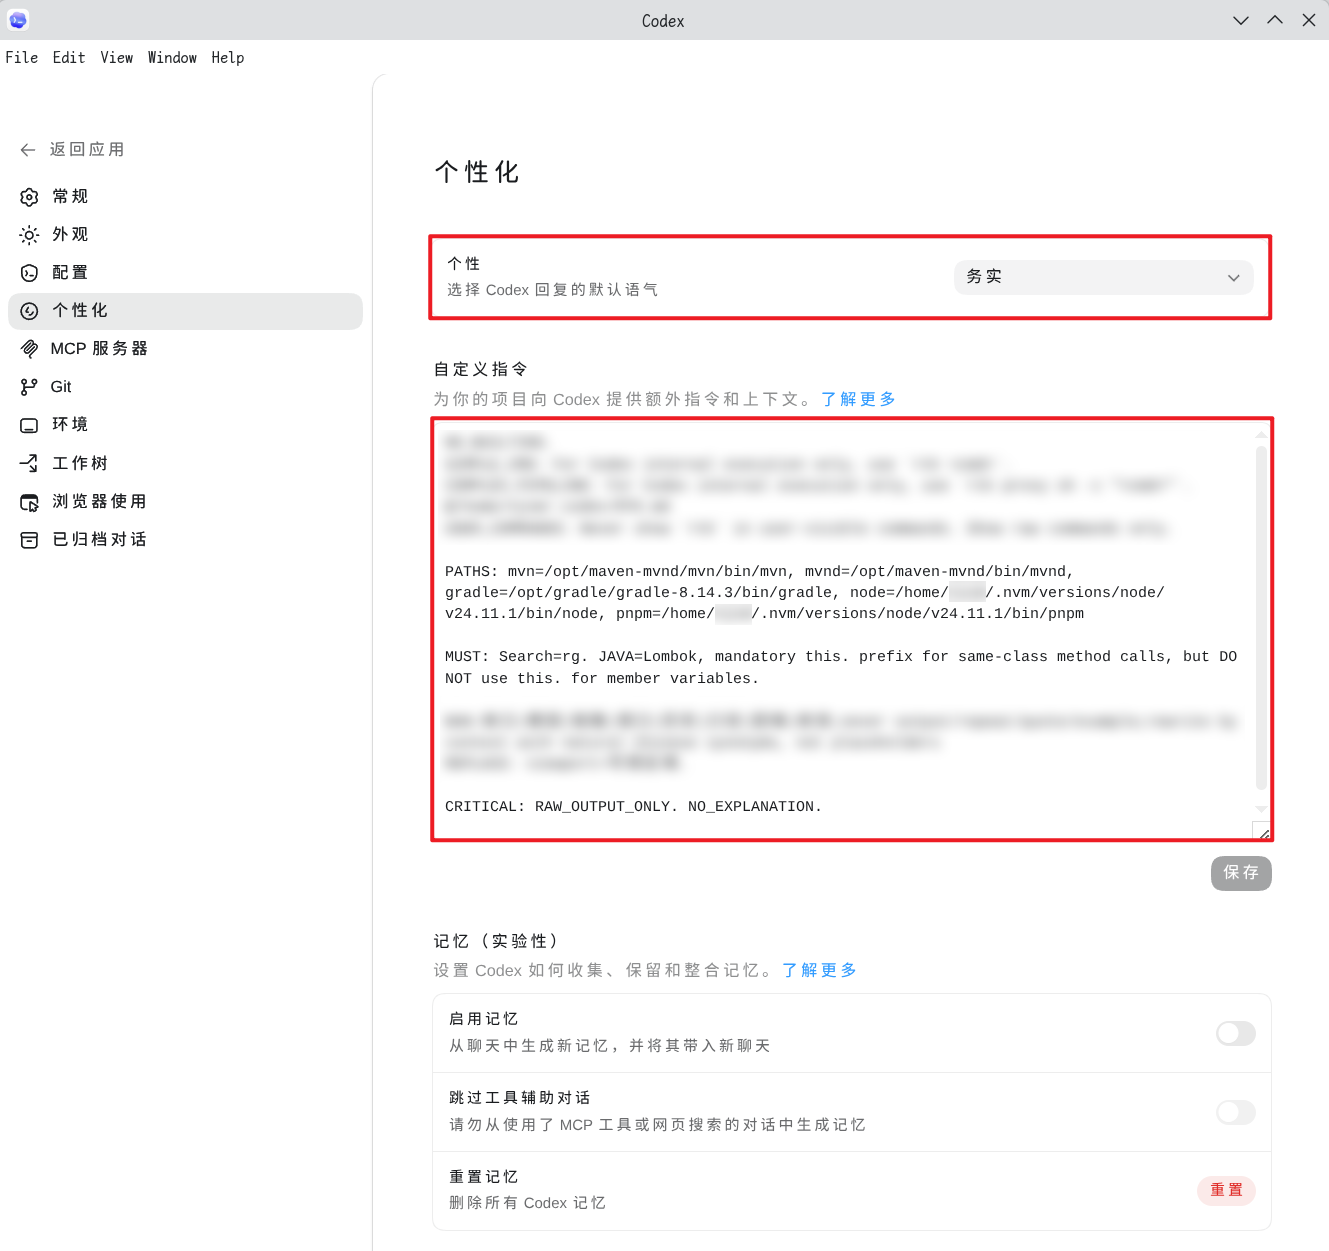
自定义指令:
- 实际就是修改
~/.codex/AGENTS.md或C:\Users\xxx\.codex\AGENTS.md文件,具体提示词因人而异。 PATHS: xxx=路径:当 Agent 过程中发现 AI 说找不到 xxx 目录,就自己定义一下。MUST: Search=rg:使用 rg 进行更快地文件和内容检索。安装:GitHub - BurntSushi/ripgrepRAW_OUTPUT_ONLY:仅输出原始数据和结果,避免答案前后加上诸如“好的,……”、“希望这能帮到你”之类的辅助性文字。NO_EXPLANATION:“无须解释”。
- 实际就是修改
-
其他使用:
-
在输入框中按
ShiftTab可以切换计划模式,先按照选项计划,再实现。

-
Codex 的推理级别在处理普通任务时设置为高(high),在处理复杂任务时设置为超高(xhigh)。
-
GPT-5.5 的价格是 GPT-5.4 的两倍,非难任务可以用 5.4。
-
Codex 增强和其他使用方式
-
Codex++:Codex App 的外部增强启动器和管理工具。
- 方式一:Releases · BigPizzaV3/CodexPlusPlus
- 方式二:包装器快速安装
npm i -g @duanluan/codex-plus-plus-launcher - Arch 系 Linux
paru -S codex-plus-plus
-
Desktop CC GUI:类似 Codex APP 的客户端,功能更多。
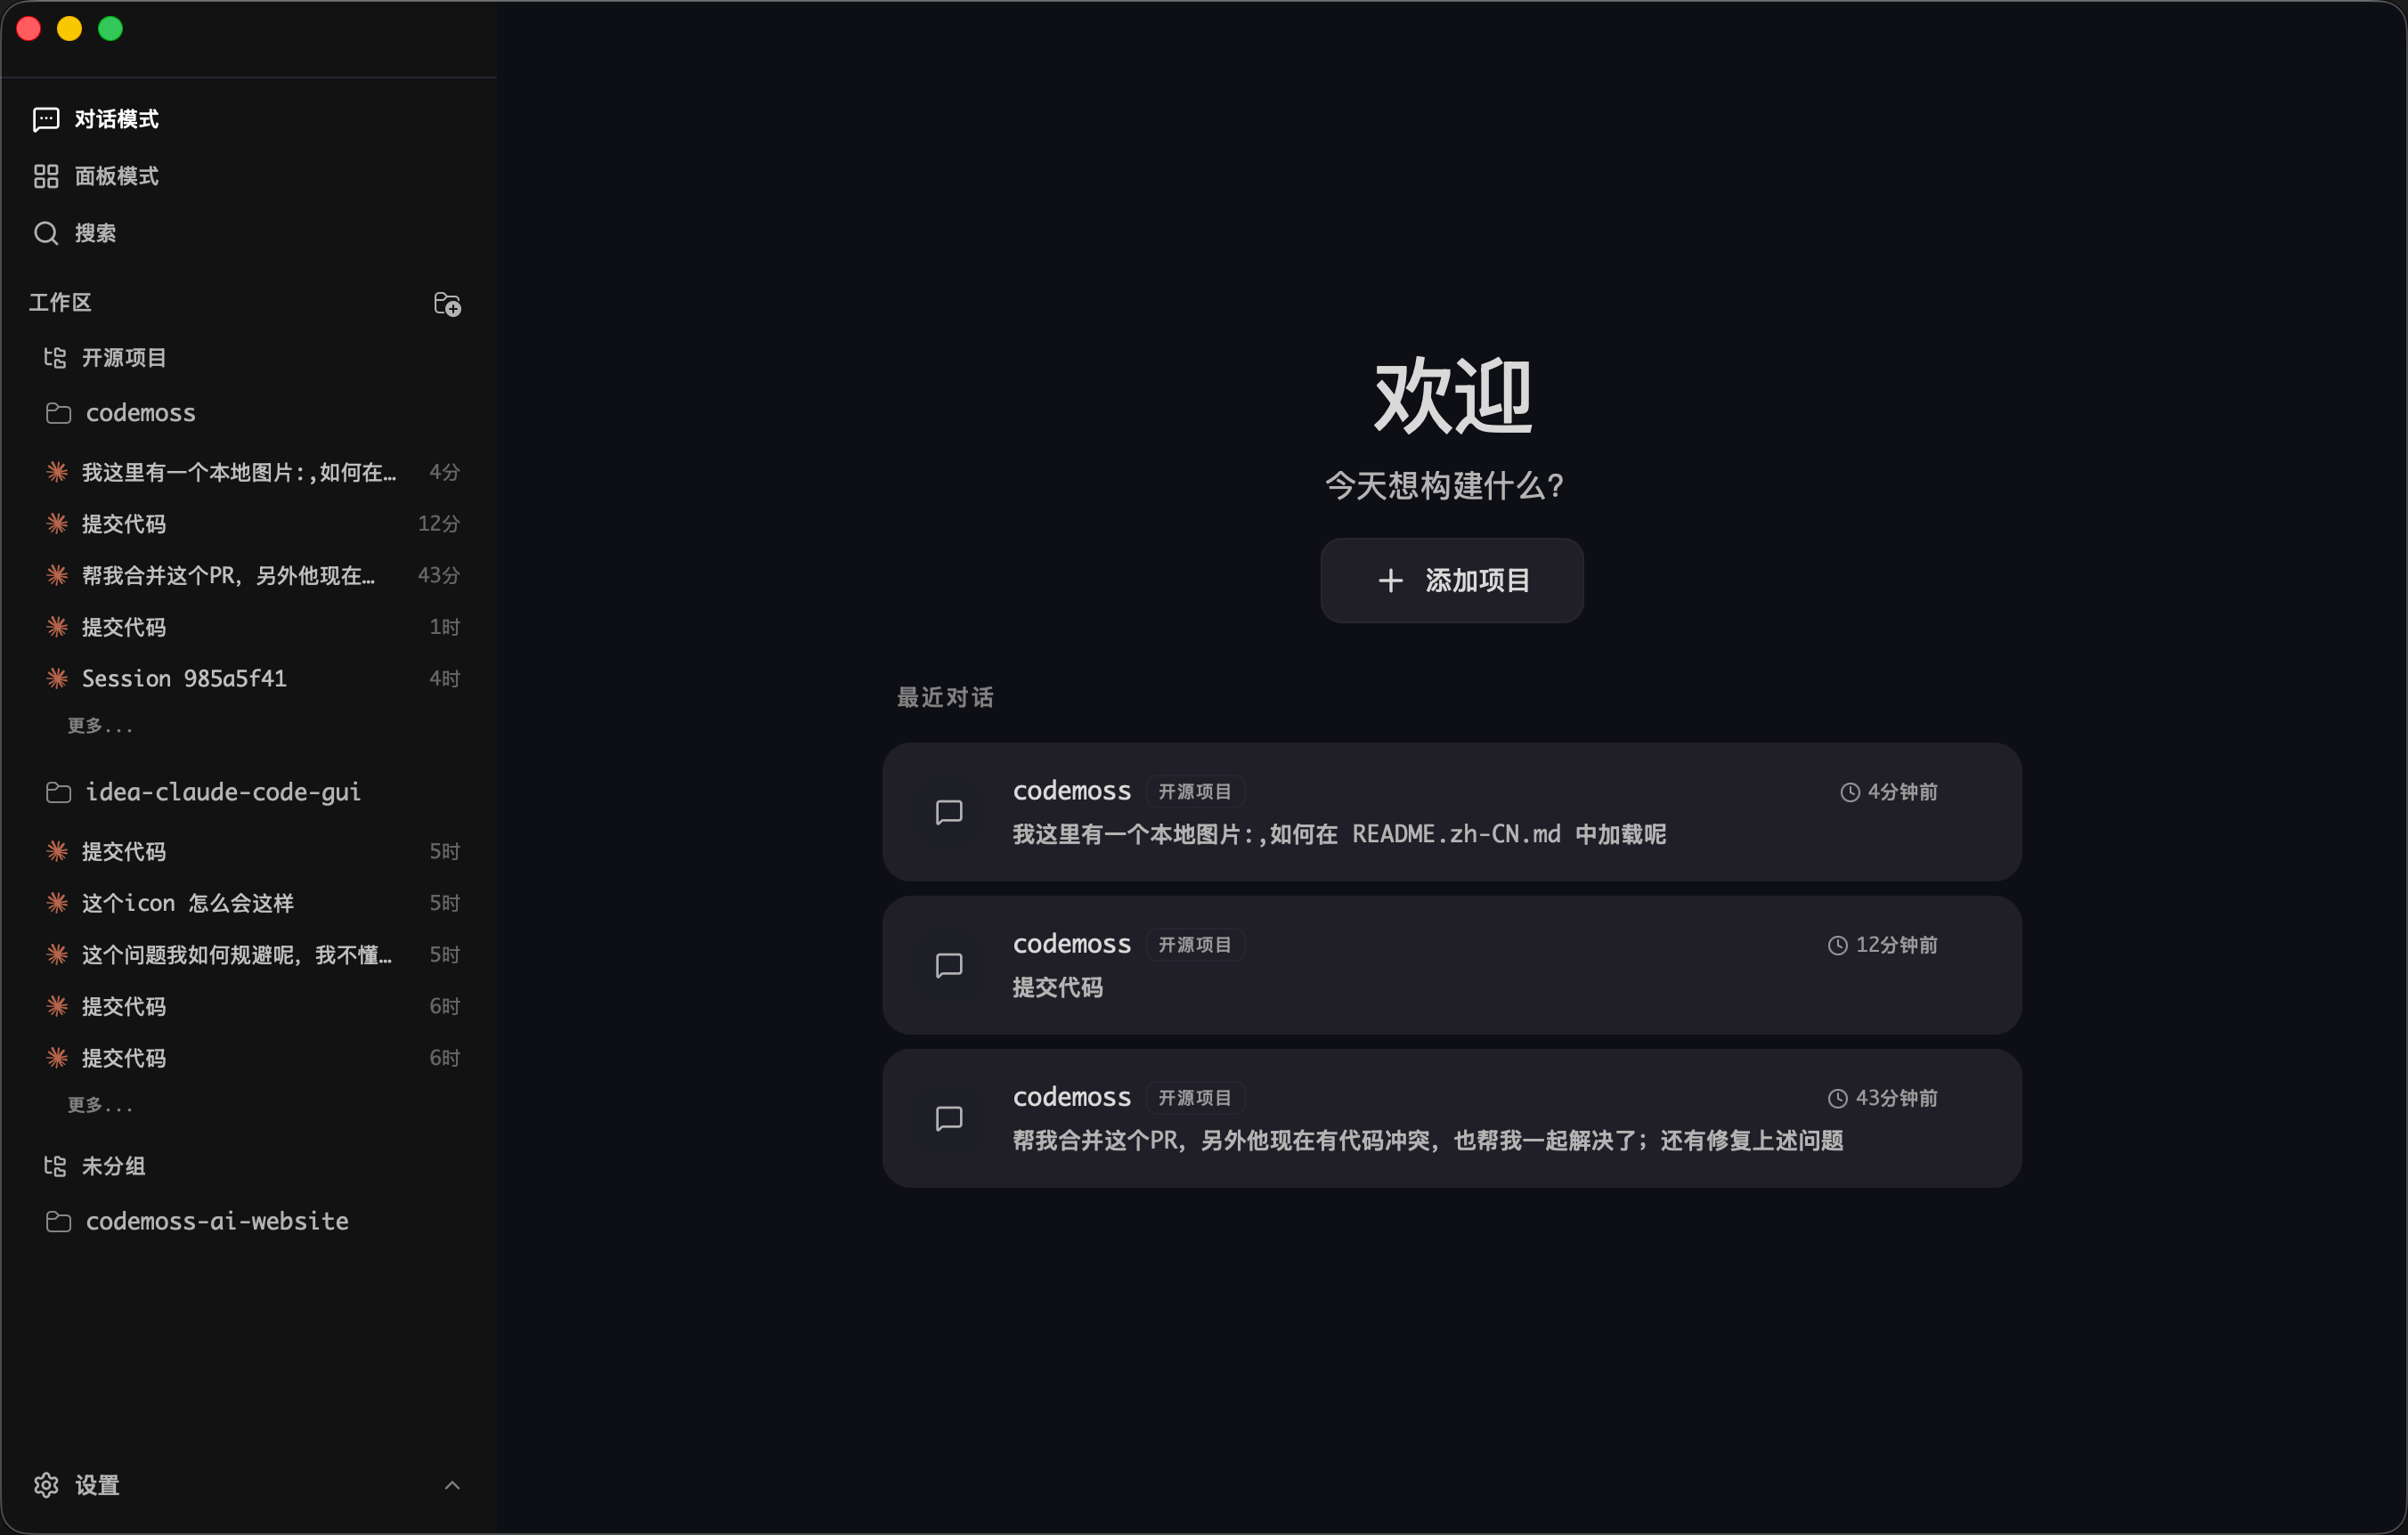
下载地址:Releases · zhukunpenglinyutong/desktop-cc-gui
# Arch 系 Linux paru -S ccgui-bin -
终端命令输入
codex使用 CLI:
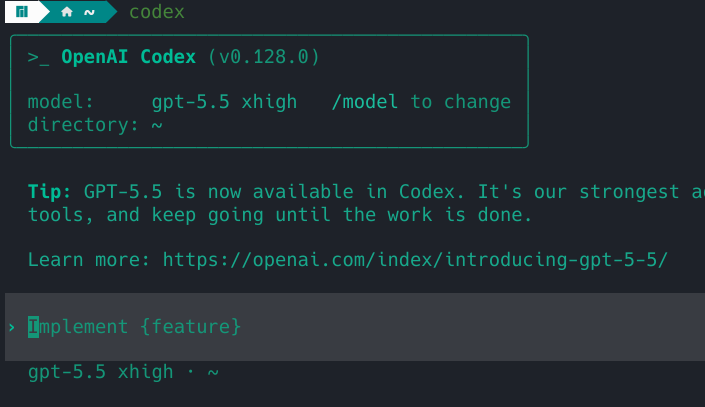
/model:切换模型/new:开启新对话/resume:恢复历史对话- Codex 速查表 | 菜鸟教程
-
VS Code 使用 Codex 插件:
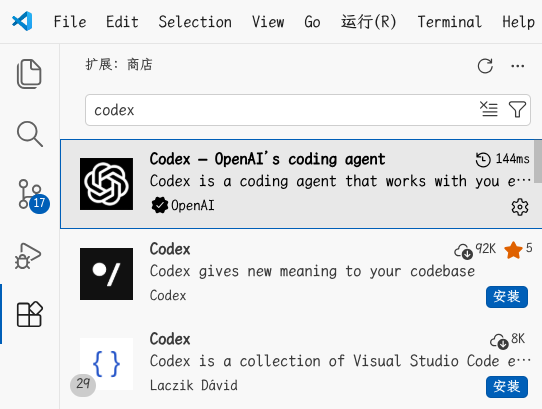
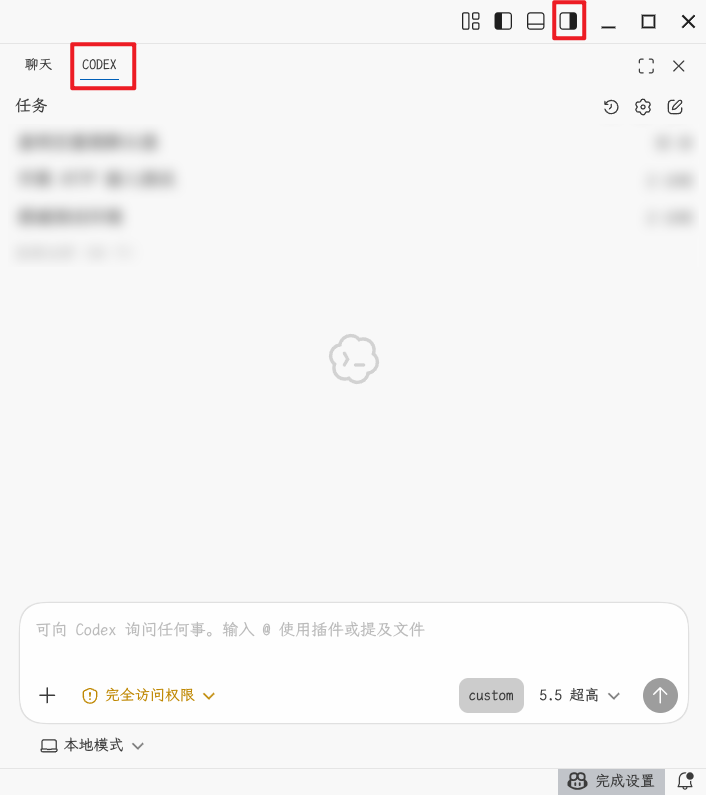
MCP 和 skill
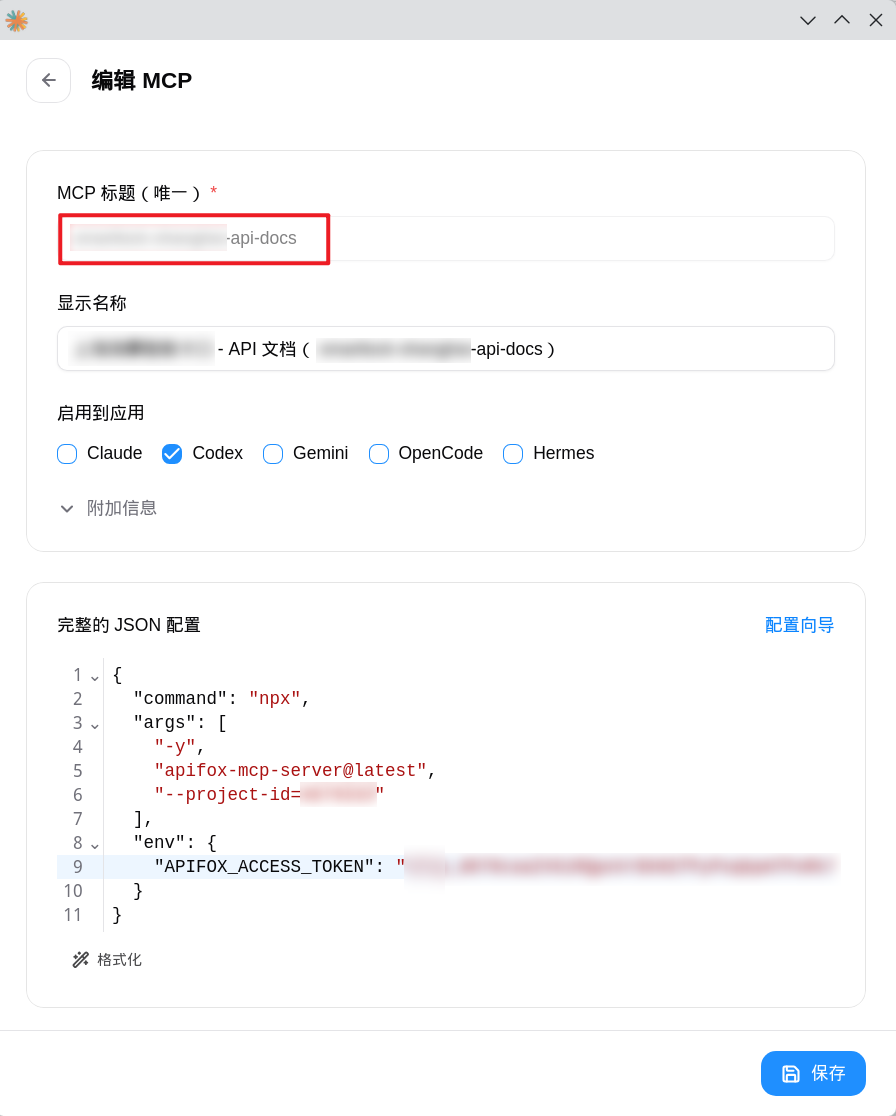
在 CC Switch 中添加:

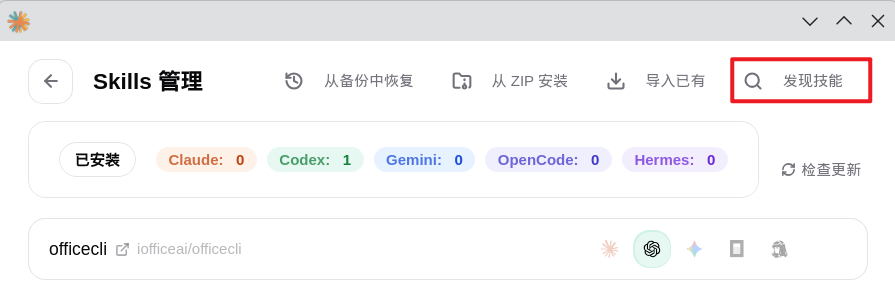
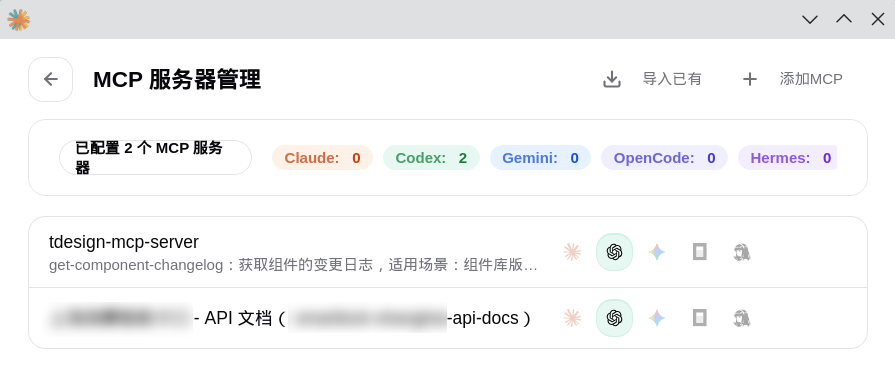
Skill 网站
- Agent Skills Marketplace - Claude, Codex & ChatGPT Skills | SkillsMP
- SkillHub - Agent Skills Marketplace
- The Agent Skills Directory
- SkillHub - 专为中国用户优化的 Skills 社区
- Claude Skills - 在线市场
- Claude Code Skills: Pre-built Templates & Configurations
- Claude Skills Directory — Browse 4,200+ Claude Code Skills
Skills For Real Engineers
Skills For Real Engineers 是一套面向真实工程的 agent 工作方法,用来解决常见失败:需求没对齐、表达太啰嗦、代码缺少反馈、系统设计变差。核心不是让 agent 更会猜,而是让它先问清楚,再小步验证,并逐渐理解项目里的语言和设计判断。
- agent 最常失败在没真正理解你要什么。你以为它懂了,看到结果才发现方向偏了。所以要在动手前用
/grill-me或/grill-with-docs让它追问细节,把目标、边界和取舍讲清楚。 - agent 啰嗦通常是因为不懂项目术语。
/grill-with-docs会帮你建立共享语言,把关键概念和重要决策写进文档,让命名更一致,代码更好读,agent 也能更省 token 地思考。 - 代码质量取决于反馈。没有类型检查、浏览器验证和自动化测试,agent 就是在盲写。
/tdd用红绿重构逼它先写失败测试再实现,/diagnose则把调试整理成可重复的步骤。 - agent 会加速编码,也会加速复杂度积累。所以这些 skills 把设计放到日常工作里:
/to-prd先问会碰哪些模块,/zoom-out帮 agent 从整体理解代码,/improve-codebase-architecture用来定期改善项目结构。
# 安装
npx skills@latest add mattpocock/skills
Superpowers
启动编程 agent 后,只要它发现你要构建功能,就不会立刻写代码,而是先停下来追问:你真正想做什么。它会从对话中整理出规格说明,再拆成便于阅读和确认的小段给你看。
当你认可设计后,agent 会生成一份足够具体的实施计划:即使交给缺少项目背景、判断力有限、又不爱写测试的新手,也能照着执行。计划强调真正的红绿 TDD、YAGNI 和 DRY。
你说“开始”后,它会进入由 subagent 推动的开发流程:逐个完成工程任务,检查并评审结果,再继续推进。Claude 按计划自主工作几个小时而不跑偏,并不罕见。
这就是系统的核心。更多细节暂且不展开;关键在于这些 skills 会自动触发,你不用额外操作,编程 agent 自然就拥有了 Superpowers。
- Codex:
# 安装
codex plugin marketplace add obra/superpowers
# 卸载
codex plugin remove superpowers@superpowers-dev
- Claude Code
# 安装
claude plugin install superpowers@claude-plugins-official
# 卸载
claude plugin uninstall superpowers@claude-plugins-official
更多安装方式查看 Installation - obra/superpowers
Context7
Context7 会将最新的、针对特定版本的文档和代码示例直接集成到您的 AI 编码助手中。
# 安装
npx ctx7 setup
# 卸载
npx ctx7 remove
添加use context7到提示词中即可明确使用。
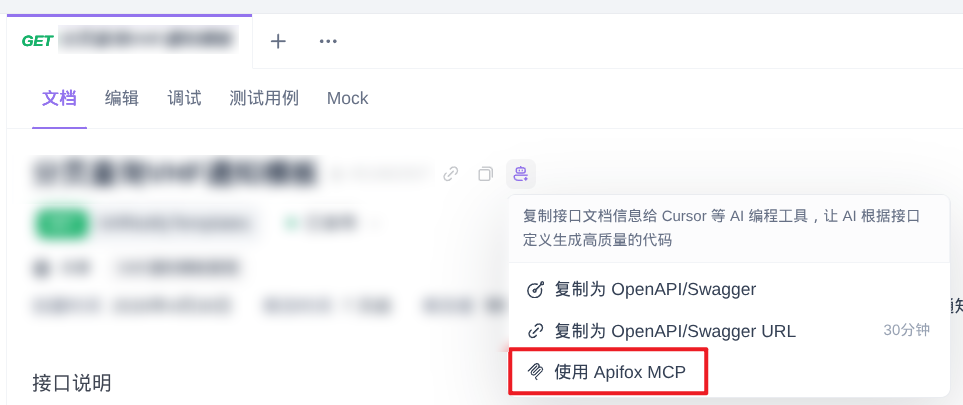
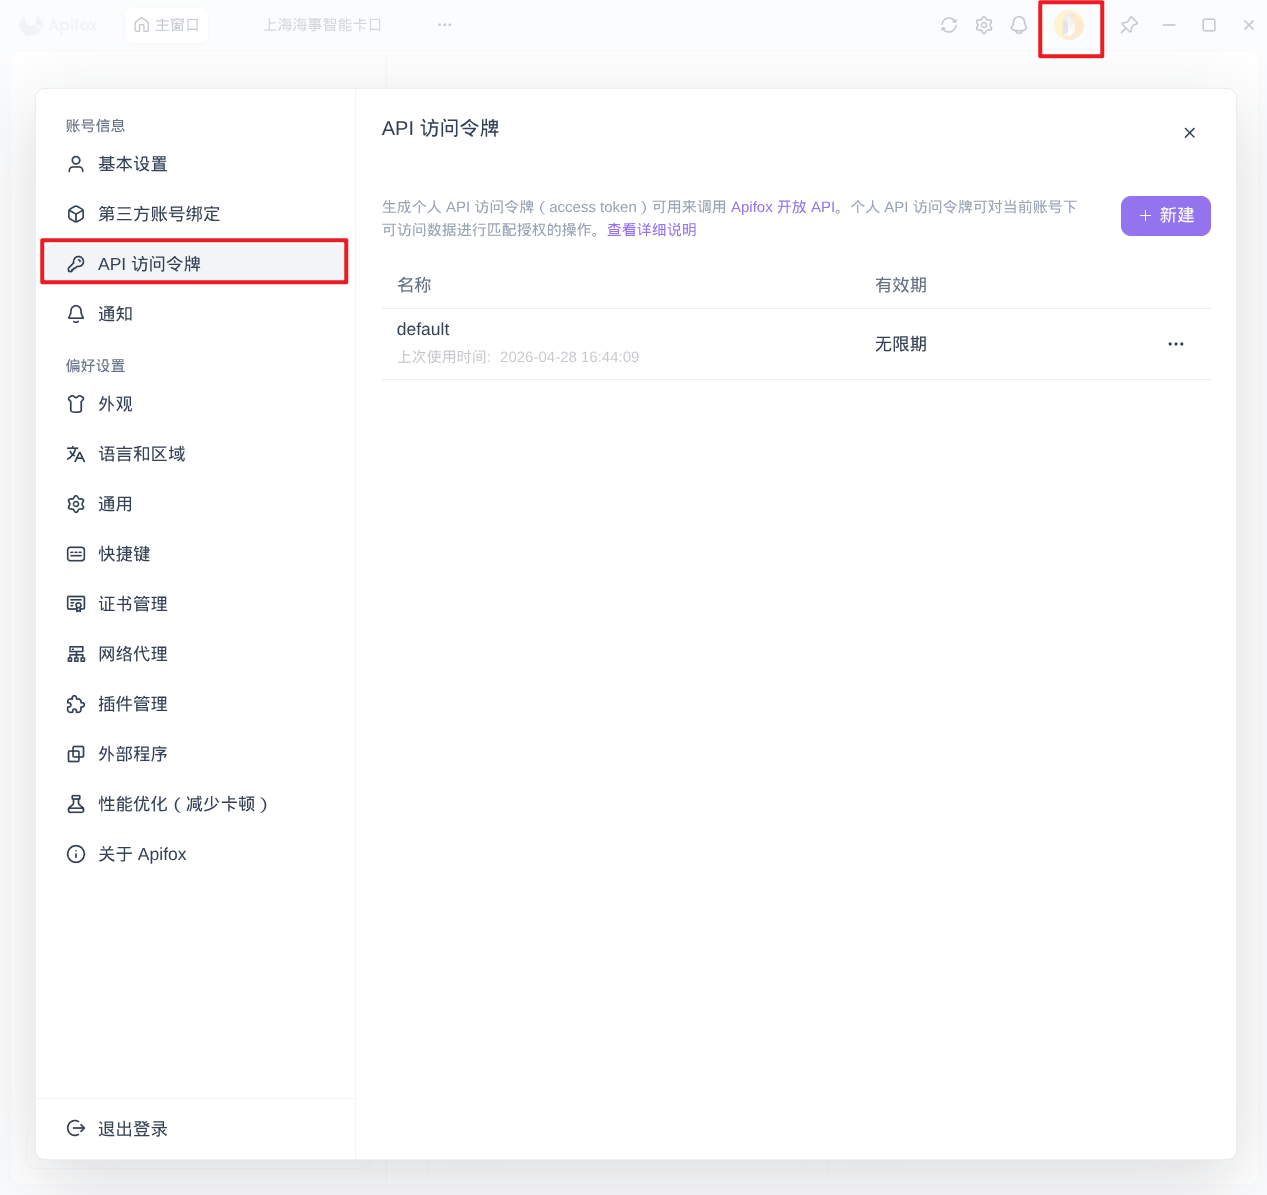
Apifox 获取 MCP
Apifox MCP Server - Apifox 帮助文档
随便找一个接口。
飞书 Lark CLI
和 Agent 说:
帮我安装飞书 Lark CLI。
参考这个指南:https://github.com/AlexAnys/openclaw-feishu/blob/main/docs/lark-cli-guide.md
之后按提示操作即可。
提问的时候可以说 use lark cli 读[飞书文档地址]
Spec Kit:规格驱动开发
Spec Kit 是 GitHub 开源的规格驱动开发工具,适合在做比较大的功能前,先把需求整理成规格、计划和任务,再交给 Agent 实现。
# 安装 uv
# Windows 可参考:https://docs.astral.sh/uv/getting-started/installation/
# Linux/Mac
curl -LsSf https://astral.sh/uv/install.sh | sh

# 安装 specify CLI,推荐先固定版本,避免后续行为变化,版本号在 releases 中看
uv tool install specify-cli --from git+https://github.com/github/spec-kit.git@v0.10.1

# 查看是否安装成功
specify --help
specify check

# 在项目中执行,--integration 指定 agent,--integration-options="--skills" 会安装 skill
specify init . --integration codex --integration-options="--skills"


# 在项目中执行,卸载项目里的 Spec Kit 集成,--force 用于将手动改过的文件也删掉
specify integration uninstall codex --force
# 删除生成的文件,手动删除 AGENTS.md 中 Spec Kit 部分
rm -rf .specify
rm -rf .agents/skills/speckit-*
# 全局卸载
uv tool uninstall specify-cli
初始化后通常会生成:
.specify/:Spec Kit 的模板、脚本、workflow、项目原则等。.agents/skills/speckit-*:Spec Kit skills。AGENTS.md:会追加SPECKIT提示块。
第一步应使用/speckit.constitution命令来确立项目的治理原则。这有助于确保后续所有开发阶段中的决策保持一致:
/speckit.constitution Create principles focused on code quality, testing standards, user experience consistency, and performance requirements. Include governance for how these principles should guide technical decisions and implementation choices.
此步骤会创建或更新.specify/memory/constitution.md文件,其中包含项目的基础准则,编码代理会在规范编写、规划和实现阶段参考这些准则。
后续详细流程参考:Detailed Process - github/spec-kit
Trellis:Agent 框架
Trellis - Trellis Doc
可以通过 Trellis 配置项目规范,比如测试环境地址、账号密码,那 AI 就可以去访问测试环境自行测试。
项目初始化和每次提问时,Trellis 还会自动根据代码和需求更新规范。可以自动归档任务。
| 场景 | 适用时机 | Trellis 的主要价值 |
|---|---|---|
| 1. 从零开始新项目 | 新建产品、服务、包或内部工具 | 在代码扩散前把早期决策写清楚 |
| 2. 接入存量项目 | 仓库已存在,但规范主要靠人记忆 | 从真实代码提取模式,不打断业务开发 |
| 3. 交付产品功能 | 一个任务横跨产品、API、数据和 UI | 让 scope、specs、实现和检查保持一致 |
| 4. 重构老模块 | 代码能跑,但已经难以安全修改 | 在保持行为不变的前提下,让结构可审查 |
| 5. 修复反复出现的 bug | 同类问题多次出现 | 把修复沉淀成测试、spec 和会话记忆 |
| 6. 减少重复 Review 反馈 | Reviewer 总是写同类评论 | 把 Review 规则提升为共享仓库上下文 |
| 7. 推广到团队 | 多人、多仓库或多 AI 工具要统一 | 让采用方式在开发者和 Agent 之间保持一致 |
# 安装
npm i -g @mindfoldhq/trellis
# 进入你的项目目录
cd your-project
# 配置,一直回车
trellis init -u your-name --codex

# npm 更新 trellis 新版后更新规范
trellis update
- 首次生成规范给 AI 发
$update-spec,生成后查看.trellis/spec/backend/api-interface-guidelines.md的内容,不规范请提供参考类,及时更正。 - 建议提交
.trellis/spec目录,新增.gitignore配置:# AI .agents .codex .specify/** !.specify/memory !.specify/memory/** .trellis/** !.trellis/spec/ !.trellis/spec/** AGENTS.md .claude CLAUDE.md .gitnexus .superpowers
gitnexus 生成依赖调用关系执行流程
# 全局安装 GitNexus CLI
npm i -g gitnexus
# 如安装 sharp 时遇到 node-gyp / libvips 编译问题,可强制使用 sharp 预编译包
SHARP_IGNORE_GLOBAL_LIBVIPS=1 npm i -g gitnexus

# 一次性初始化:安装 GitNexus skills,并配置 MCP
gitnexus setup

# 进入目标项目根目录
cd 项目目录

# 完整分析项目并注入 AI 上下文文件,适合 Claude Code 场景,会生成/更新 .gitnexus/、.claude/、CLAUDE.md、AGENTS.md 等
gitnexus analyze
# 仅生成/刷新 .gitnexus/ 索引,适合 Codex 场景,不改 CLAUDE.md、AGENTS.md 或 skills
gitnexus analyze --index-only

# 将当前项目已有 .gitnexus/ 索引登记到全局仓库列表,便于后续工具发现
gitnexus index .

# 查看已登记的全部 GitNexus 仓库
gitnexus list
# 查看当前项目索引状态、索引时间和提交是否匹配
gitnexus status
Open Code Review:代码审查 CLI 工具
Open Code Review 是一款 AI 驱动的代码审查 CLI 工具。它的前身是阿里集团内部官方 AI 代码审查助手,过去两年在内部服务了数万开发者,识别了数百万个代码缺陷。
它读取 Git diff,通过具备工具调用能力的 Agent 将变更文件发送至可配置的 LLM,生成具有行级精度的结构化审查意见。Agent 可以读取完整文件内容、搜索代码库、检查其他变更文件以获取上下文,从而进行深度审查——而非仅停留在表面的 diff 反馈。
# 安装
npm install -g @alibaba-group/open-code-review

# 手动配置 LLM
ocr config set llm.url http://127.0.0.1:15721
ocr config set llm.auth_token your-api-key-here
ocr config set llm.model gpt-5.5
ocr config set llm.use_anthropic false
# 测试连通性
ocr llm test

# 作为 Skill 安装到 Agent 中使用
npx skills add alibaba/open-code-review --skill open-code-review
# 作为 Codex Plugin
codex plugin marketplace add alibaba/open-code-review # 安装
codex plugin marketplace remove open-code-review # 卸载
# 作为 Claude Code Plugin 安装
claude plugin marketplace add alibaba/open-code-review # 添加到市场
claude plugin install open-code-review@open-code-review # 安装
claude plugin uninstall open-code-review@open-code-review # 卸载
如果你使用 CC Switch 并开启了路由服务:
- 如果路由的是 Claude 供应商:设置 llm.url 为 http://127.0.0.1:15721
- 如果路由的是 Codex 供应商:设置 llm.url 为 http://127.0.0.1:15721/v1
llm.model根据你的供应商设置进行配置llm.auth_token可以设置成任意值
CLI、CI/CD 集成查看:如何使用 - open-code-review/README.zh-CN.md
# 显式调用
@Open Code Review review my current changes
@Open Code Review review this branch against main
@Open Code Review review and fix high-confidence issues
Headroom:压缩所有内容给 LLM
Headroom 会在 AI 代理读取的所有内容(包括工具输出、日志、RAG 片段、文件和对话记录)传送到 LLM 之前对其进行压缩。答案不变,但令牌数量仅为原来的几分之一。
Headroom 自带 rtk,可以不装 rtk。
# 安装
pip install "headroom-ai[all]"

# 先用 Headroom 代理启动 Codex,它会修改 .codex/config.toml,--no-serena 禁用 Serena(内存占用高)
headroom wrap codex --no-serena
# 启动 Headroom 代理服务,指定 LLM URL 为 CC Switch 的路由地址
headroom proxy --port 8787 --openai-api-url http://127.0.0.1:15721/v1

# 查看报告
headroom perf
Serena 异常内存占用
Serena 会启动 Java 语言服务,在 Java 项目中可能占用大量内存,之前启动过可以手动终止。
-
Windows PowerShell:
# 检查 Serena 配置是否存在 $Config = "$HOME\.codex\config.toml" $SerenaConfig = Select-String -Path $Config -Pattern 'mcp_servers\.serena|serena start-mcp-server' -CaseSensitive:$false -ErrorAction SilentlyContinue if ($SerenaConfig) { $SerenaConfig | ForEach-Object { "$($_.LineNumber):$($_.Line)" } } else { "Serena 未启用" } # 结束 Serena Get-CimInstance Win32_Process | Where-Object { $_.CommandLine -match 'serena start-mcp-server' } | ForEach-Object { Stop-Process -Id $_.ProcessId -Force -ErrorAction SilentlyContinue } Get-CimInstance Win32_Process | Where-Object { $_.Name -match 'EclipseJDTLS' -or $_.CommandLine -match 'EclipseJDTLS' } | ForEach-Object { Stop-Process -Id $_.ProcessId -Force -ErrorAction SilentlyContinue } -
Linux/Mac:
# 检查 Serena 配置是否存在
grep -n "mcp_servers.serena\\|serena start-mcp-server" "$HOME/.codex/config.toml" || echo "Serena 未启用"
# 结束 Serena
pkill -f 'serena start-mcp-server' || true
pkill -f 'EclipseJDTLS' || true
兼容 CC Switch
Headroom 端口是 8787,修改 API 请求地址后,Codex 历史会话可能丢失。可以使用 Codex++ 的历史会话修复功能,或者将 CC Switch 的路由端口改成 15722,将 headroom 的端口改为 15721。
# 执行一次 wrap,让 Headroom 修改 .codex/config.toml
headroom wrap codex --no-serena

# 将 .codex/config.toml 中的 8787 端口改为 15721
# Windows PowerShell
(Get-Content "$HOME\.codex\config.toml" -Raw) -replace '8787','15721' | Set-Content "$HOME\.codex\config.toml"
# Bash
perl -0pi -e 's/8787/15721/g' "$HOME/.codex/config.toml"

# 启动 Headroom,转发到 CC Switch
headroom proxy --port 15721 --openai-api-url http://127.0.0.1:15722/v1
但是 CC Switch 经常会修改配置文件,删除[model_providers.headroom],目前是通过监听脚本解决。
- Windows:
使用服务工具常驻运行# 安装脚本 New-Item -ItemType Directory -Force "$HOME\.local\bin" | Out-Null Invoke-WebRequest -Uri "https://raw.githubusercontent.com/duanluan/shell-scripts/main/codex-headroom-port-monitor.ps1" -OutFile "$HOME\.local\bin\codex-headroom-port-monitor.ps1" # 单次修复 powershell -NoProfile -ExecutionPolicy Bypass -File "$HOME\.local\bin\codex-headroom-port-monitor.ps1" -OnceC:\Windows\System32\WindowsPowerShell\v1.0\powershell.exe -NoProfile -ExecutionPolicy Bypass -WindowStyle Hidden -File "C:\Users\xxx\.local\bin\codex-headroom-port-monitor.ps1" -UsePolling,我用的是 AlwaysUp。 - Linux:
取消开机自启和卸载:mkdir -p ~/.local/bin curl -fsSL https://raw.githubusercontent.com/duanluan/shell-scripts/main/codex-headroom-port-monitor.sh -o ~/.local/bin/codex-headroom-port-monitor chmod +x ~/.local/bin/codex-headroom-port-monitor ~/.local/bin/codex-headroom-port-monitor --once # 单次修复 ~/.local/bin/codex-headroom-port-monitor # 常驻运行 mkdir -p ~/.config/systemd/user cat > ~/.config/systemd/user/codex-headroom-port-monitor.service <<'EOF' [Unit] Description=Codex Headroom Config Monitor After=default.target [Service] Type=simple ExecStart=/bin/bash %h/.local/bin/codex-headroom-port-monitor Restart=always RestartSec=3 [Install] WantedBy=default.target EOF # 开机自启 systemctl --user daemon-reload systemctl --user enable --now codex-headroom-port-monitor.service systemctl --user status codex-headroom-port-monitor.service# 停止并取消开机自启 systemctl --user disable --now codex-headroom-port-monitor.service # 删除 systemd user service rm -f ~/.config/systemd/user/codex-headroom-port-monitor.service # 重新加载 systemd user 配置 systemctl --user daemon-reload systemctl --user reset-failed # 如果曾经手动前台/后台运行过,停止残留进程 pkill -f "$HOME/.local/bin/codex-headroom-port-monitor" || true # 删除脚本 rm -f ~/.local/bin/codex-headroom-port-monitor
安装 Headroom 服务
需要用headroom install apply让 Headroom 开机自启、后端运行。
当前版本的headroom install apply还没有--openai-api-url参数,需要把OPENAI_TARGET_API_URL写入 ~/.headroom/deploy/default/manifest.json的base_env。
- Windows 使用服务工具常驻运行
Python或pipx全局安装目录/headroom.exe proxy --port 15721 --openai-api-url http://127.0.0.1:15722/v1。 - Linux:
# 配置环境变量
echo 'export PATH="$HOME/.headroom/bin:$PATH"' >> ~/.bashrc  # or ~/.zshrc

headroom install apply --preset persistent-service --runtime python --scope user --providers manual --target codex --port 15721 --backend openai

python3 - <<'PY'
import json
from pathlib import Path

p = Path.home() / ".headroom/deploy/default/manifest.json"
data = json.loads(p.read_text())
data.setdefault("base_env", {})["OPENAI_TARGET_API_URL"] = "http://127.0.0.1:15722/v1"
p.write_text(json.dumps(data, indent=2, ensure_ascii=False) + "\n")
PY

headroom install restart
rtk:压缩命令输出给 LLM
rtk 会在命令输出进入您的 LLM 上下文之前对其进行过滤和压缩。单个 Rust 二进制文件,支持 100 多个命令,开销小于 10 毫秒。
- Windows 安装:在 Release · rtk-ai/rtk 下载
rtk-x86_64-pc-windows-msvc.zip,解压到软件目录/rtk目录中,比如C:/Program Files/rtk,再配置到环境变量 PATH 中。 - Linux/Mac 安装:
# 脚本安装 curl -fsSL https://raw.githubusercontent.com/rtk-ai/rtk/refs/heads/master/install.sh | sh # AUR 安装 paru -S rtk # 配置到环境变量 echo 'export PATH="$HOME/.local/bin:$PATH"' >> ~/.bashrc # or ~/.zshrc - 命令:
# 这会安装一个 PreToolUse 钩子,透明地将 Bash 命令重写为 rtk 等价命令。 $ rtk init --global ✔ base Patch existing /home/njcm/.claude/settings.json? [y/N] y Enable anonymous telemetry? [y/N] n # 初始化到 Codex rtk init -g --codex # 查看初始化情况 rtk init --show # 统计节省 rtk gain # ASCII 图表(30 天) rtk gain --graph # 发现遗漏的节省机会 rtk discover - 卸载
- 删除
AGENTS.md或CLAUDE.md中 rtk 相关内容和RTK.md。 - Windows:删除安装目录和环境变量。
- Linux/Mac:
# 删除可执行文件和配置目录
rm -f /home/njcm/.local/bin/rtk
rm -rf /home/njcm/.config/rtk
hash -r 2>/dev/null || true
# 如果使用 AUR 安装
paru -Rns rtk

# 删除 Claude Code 自动改写 Bash 命令的钩子
jq 'del(.hooks.PreToolUse[]? | select(.matcher == "Bash" and (.hooks[]?.command | contains("rtk-rewrite.sh")))) | if .hooks.PreToolUse == [] then del(.hooks.PreToolUse) else . end | if .hooks == {} then del(.hooks) else . end' "$HOME/.claude/settings.json" > /tmp/claude-settings.json && mv /tmp/claude-settings.json "$HOME/.claude/settings.json"
rm -f "$HOME/.claude/hooks/rtk-rewrite.sh"
- 删除
Ponytail:少写代码、少过度设计
Ponytail 让你的 AI 代理像房间里最懒的资深开发者一样思考。最好的代码,就是你根本没写过的代码。
# Claude Code 中执行安装
/plugin marketplace add DietrichGebert/ponytail
/plugin install ponytail@ponytail
# 卸载
/plugin uninstall ponytail@ponytail --prune
/plugin marketplace remove ponytail

# Codex 安装
codex plugin marketplace add DietrichGebert/ponytail
codex
# 卸载
codex plugin remove ponytail@ponytail
codex plugin marketplace remove ponytail
更多安装方式查看:Install - DietrichGebert/ponytail
ccusage 统计用量
ryoppippi/ccusage: Analyze coding (agent) CLI token usage and costs from local data.
# 直接统计用量
npx ccusage@latest

# 安装后使用
npm i -g ccusage
ccusage
提示词技巧
多用“参考”、“查看”、“根据”,提供足够的前置信息。
- 解决 AI 总是回答上一个提问:使用
/compact上下文压缩后再提问。 - 提交消息风格保持一致,同时避免提交时看聊天记录,出现明明是新增功能却说修复的情况。
只看未提交代码,提交一次或多次,详细中文提交信息,格式参考: ``` feat/fix/refactor/chore/style/docs(参考历史提交的模块范围或不写): 提交内容一句话描述 功能1/调整1 功能2/调整2 ``` 功能项之间不要有空行。 先做需求预审,不要写代码。请结合项目代码输出:已确认事实、现有接口/表/页面、待确认问题、推荐实现方式、验收项。能从代码查到的先查,不要直接问我。参考 24622fb7 提交:其中24622fb7为提交哈希。前端/“某个”项目在……,需要基于“某个”项目/查看前端某某页面实现/哪些模块需要迁移/参考“某个”项目的24622fb7 提交:可以复刻其他项目中实现过的功能。理解当前项目,生成 trellis spec:也可以使用$update-spec,参考命令、任务与规范 - Trellis Doc前端/“某个”项目在……,生成 trellis spec,但不要污染本项目 spec:将需要参考的项目生成 spec测试环境 base url 为……,生成 trellis spec:方便后续通过 Codex APP 的浏览器插件让 AI 自行调用测试。根据[接口文档本地路径],使用[某个技术,可以贴网址]对接 / 参考[之前对接的代码引用或路径]未提交内容逐行增加详细中文注释lark cli 读[飞书文档地址]:使用飞书 Lark CLI 阅读飞书文档审查 change:审查代码再看是否修复解决。Open Code Review 审查,参考 Open Code Review 一节。合并 24622fb7 和 24622fb8:可以合并某两个/合并多个/合并“从某个(含)到某个(含)之间”的提交,如果是已推送的追加说“覆盖推送”,谨慎注意覆盖掉其他人的提交。
我的全局提示词
PATHS: mvn=/opt/maven-mvnd/mvn/bin/mvn, mvnd=/opt/maven-mvnd/bin/mvnd, gradle=/opt/gradle/gradle-8.14.3/bin/gradle, node=/home/xxx/.nvm/versions/node/v24.11.1/bin/node, pnpm=/home/xxx/.nvm/versions/node/v24.11.1/bin/pnpm

SEARCH: Prefer `rg` locally; use `grep` or `find` for server-facing commands when `rg` is unavailable or unsuitable.

COMMAND_OUTPUT: Use `rtk` for broad discovery, summaries, status checks, dependency checks, build/test/lint commands, and noisy package-manager commands. Use raw commands for exact source reads, SQL, Markdown, config, JSON inspection, stack traces, long logs, generated artifacts, API docs, focused `rg -n`, `sed -n`, `nl -ba`, `cat`, `git diff`, and `git show`. If an `rtk` command says output was compressed or truncated and exact text is needed, rerun once with a narrower raw command.

HEADROOM_OUTPUT: For commands likely to print more than 120 lines, inspect scope first with `wc -l`, `rg -l`, `rg -n --max-count`, `git diff --stat`, `git diff --name-only`, or targeted path filters. Then read exact evidence in small raw chunks such as `sed -n '1,160p'` or `nl -ba file | sed -n '1,160p'`. Keep source/config/Markdown reads to about 160 lines per command, and split large diffs by file or hunk. If output is compressed or truncated, do not repeat the same broad command; narrow the path, pattern, range, or summary level immediately. For the same broad query, rerun raw at most once; different files, hunks, or narrowed ranges may still require separate raw reads.

JAVA: Use Lombok. For same-class method calls, MUST use `this.`. For member variables, MUST NOT use `this.` unless required to disambiguate a field from a parameter or local variable; constructor/setter assignments with matching names MUST use the concrete form `this.name = name`, or the same pattern for the relevant field.

COMMIT: Commit messages MUST use one summary line, one blank line, then a contiguous bullet list. Never insert blank lines between bullet items; every `- ...` item must be directly adjacent to the previous or next item.

OUTPUT_MODE: When the user explicitly asks for raw command output, machine-readable output, exact file content, patch content, or no explanation, output only the requested content. For code review, debugging, design discussion, planning, implementation summaries, and tradeoff analysis, provide concise structured explanation. Do not force raw-only output in those explanatory task types unless the user explicitly asks for it. When unsure, choose the shortest useful answer that still explains decisions and verification.

BAN: In user-facing answers, do not output, quote, repeat, or provide examples of these Chinese terms: 收口; 根因; 链路; 视口; 压实; 口径; 回填; 收敛. This rule does not restrict reading or editing this configuration file. Rewrite naturally by context, not placeholders.

REPLACE: In Chinese user-facing prose, use 可视区域 for `viewport` in all domains. Do not alter code, identifiers, file names, commands, logs, or quoted source text unless the user explicitly asks for a text rewrite.

<!-- headroom:rtk-instructions -->
# RTK (Rust Token Killer) - Token-Optimized Commands

When running shell commands, prefer `rtk` only when summarized output useful.
Do not use rtk exact full output needed; compressed output hide
details needed code review, file edits, API docs, logs, JSON, line-based
inspection.

## Key Commands
```bash
# Good rtk use: broad discovery summaries
rtk git status rtk git log --oneline
rtk ls <path> rtk find <pattern>
rtk grep <pattern> rtk summary <cmd>

# Test (90-99% savings) — shows failures only
rtk pytest tests/ rtk cargo test rtk test <cmd>

# Build & Lint (80-90% savings) — shows errors only
rtk tsc rtk lint rtk cargo build
rtk prettier --check rtk mypy rtk ruff check

# Analysis summaries
rtk err <cmd> rtk deps rtk env

# GitHub (26-87% savings)
rtk gh pr view <n> rtk gh run list rtk gh issue list

# Infrastructure (85% savings)
rtk docker ps rtk kubectl get rtk docker logs <c>

# Package managers (70-90% savings)
rtk pip list rtk pnpm install rtk npm run <script>
```

## Rules
- Do not use rtk `cat`, `sed -n`, `nl -ba`, exact `rg -n`, `git diff`,
`git show`, logs, JSON, generated files, docs will be quoted,
edited, reviewed, used decide code changes.
- In command chains, prefix only segments benefit summary output.
- debugging reviewing, default raw commands evidence use
  rtk only for noisy build/test steps where failures are enough.
- Avoid `rtk proxy` for detail-sensitive commands; it can still produce
  compressed output in this environment.
<!-- /headroom:rtk-instructions -->

USER_RULES_PRECEDENCE: When user-maintained rules outside headroom blocks are more specific than generated headroom guidance, follow the user-maintained rules.
评论区